Images in HTML

With faster modems, shorter download time, and larger bandwidth, images have become an enormous part of the web. When using HTML, you must not only be concerned that your image is going to show up, but how large it is going to be, and were on the screen.
The most important thing about using images is that you have them to begin with. There are a variety of ways to acquire images. The easiest (and the most often used) is to simply capture them strait off the Internet. When using Netscape, you can click on an image on the screen, and then download it. When using a PC, right click, and when using a Mac, either hold down the button over the image (which will bring up a menu) or drag and drop it to the folder you want to copy it to. To find these images, it is easiest to go to one of the many search engines around and search to it. This will be covered in later sections. Sometimes you simply will not be able to find the exact image that you need or you need something personalized. Then you must use a graphics program to edit an image yourself. How to use a graphics program is far beyond the scope of this tutorial, but they can be downloaded off the net, as well. It is very important that you save your images as either GIF files (with .gif at the end of the file name) or JPEG files (.jpg files). It is better to use the JPEG format when possible because the files are smaller and will take less time to download.
The general syntax for displaying images on the screen is:
<IMG SRC = "filename">The rather cryptic IMG SRC stands for IMaGe SouRCe, which basically tells the browser that an image file is following. filename is the complete name of the file, including its extension (.gif or .jpg). Many times people will put .jpg instead of .gif (or vice versa) and the browser will not find the file. Browsers will sometimes over look images if the case is different, remember that File.gif and file.gif are two different file names.
Example:
<IMG SRC = "centauri2.jpg"> This is a picture of the Omega Centauri galaxy, which includes Alpha Centauri. |
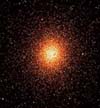 This is a picture of the Omega Centauri galaxy,
which includes Alpha Centauri.
This is a picture of the Omega Centauri galaxy,
which includes Alpha Centauri.
|
As you can see from the above example, when you insert an image, it is put in the stream of text. Aligning an image defines where on the screen it will be displayed, centered or to the right or left on the screen. This will also allow text to wrap around your images.
To align an image you must use what I call a tag parameter. A tag parameter controls certain properties of a tag. For our example, we want to align an image to the right side of the screen.
Example:
<IMG SRC = "centauri2.jpg" ALIGN = RIGHT> This is a picture of the Omega Centauri galaxy, which includes Alpha Centauri. |
This is a picture of the Omega Centauri galaxy,
which includes Alpha Centauri.
|
In this example, the tag parameter is ALIGN, and it's argument is RIGHT. In every tag parameter there will appear an equal sign (=) and an argument. With the ALIGN parameter we can use CENTER, RIGHT, or LEFT to align our image, which are demonstrated below.
<IMG SRC = "centauri2.jpg" ALIGN = LEFT> This is a picture of the Omega Centauri galaxy, which includes Alpha Centauri. |
This is a picture of the Omega Centauri galaxy,
which includes Alpha Centauri.
|
<IMG SRC = "centauri2.jpg" ALIGN = CENTER> This is a picture of the Omega Centauri galaxy, which includes Alpha Centauri. |
This is a picture of the Omega Centauri galaxy,
which includes Alpha Centauri.
|
Using CENTER as an aligning argument is very tricky, and is counter intuitive. When you use it, try to think of the ALIGN parameter as dealing with the text that will come after it, not that is will center the picture on the screen.
After you have gotten your image and put it into your web page, you may find that it is too small, or too big. HTML does allow you to resize your images, but sometimes with less than perfect results. Resizing an image uses a pair of parameters; WIDTH and LENGTH. These two parameters do exactly what they mean, the width parameter will change the width of the image and the length will adjust the length. The arguments for these pair of parameters are pixels.
Example:
<IMG SRC = "centauri2.jpg" HEIGHT = 200 WIDTH = 200> This is a picture of the Omega Centauri galaxy, which includes Alpha Centauri. |
This is a picture of the Omega Centauri galaxy,
which includes Alpha Centauri.
|
<IMG SRC = "centauri2.jpg" HEIGHT = 20 WIDTH = 20> This is a picture of the Omega Centauri galaxy, which includes Alpha Centauri. |
|
You can see from the above examples that the image is distorted, especially when you try to expand it. My personal suggestion is to not use these parameters unless you wish to change the size just a few pixels. When you need to drastically change an image's size, use a graphics program. Some such programs are listed on my download page.

|

|

|